Quick Start FAQ'S


Metro Website Builder

Login to your MetroERP System. If you do not have your URL, please contact us at support@metrogroup.solutions for details of your account. 

The first thing you should do is to change your password.

Please find a video on how to change your password here  https://youtu.be/ULwwUvS-a-c

Please check the video for "Exporting and importing Data" :  https://youtu.be/TbbK1tYFLxI

To get more details on how to use the Website Builder, please do  contact us at  support@metrogroup.solutions

1) Go to the top left and click on the menu option. 


2) Select the website module

3) Click on " Go to Website " button


4) Click on " Edit " on the top-right corner and start editing your website

To get more details on how to use the Website Builder, please do  contact us at  support@metrogroup.solutions

1) Go to the top left and click on the menu option. 


2) Select the website module.

3) Click on " Go to Website " button.

4) Click on " Pages -- Edit menu " from the header.


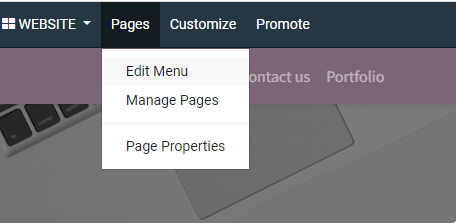
5) Next, a pop-up will be opened. Click on " Add menu item " .


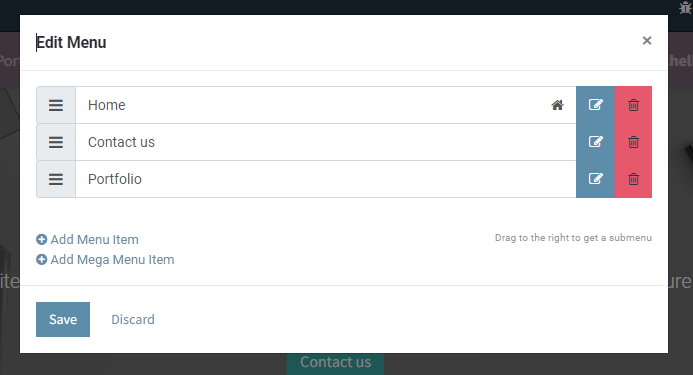
6) Enter menu label (menu name) URL. [Here you need to set this page URL e.g. "About us" page URL could be www.xyz.com/about-us, here you need to enter  /about-us ].


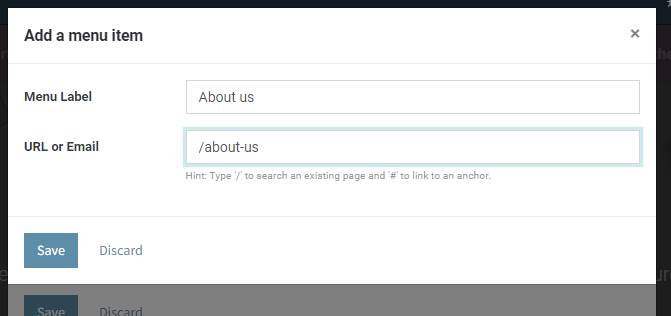
7) Click on " Save ".

To get more details on how to use the Website Builder, please do  contact us at  support@metrogroup.solutions

  1) Go to the top left and click on the menu option. 


2) Select the website module.

3) Click on " Go to Website " button.

4) Click on " Edit " on the top-right corner and start editing your website.

5) Click on any place of header and in the right side, from " Style " section, you will see template option. From the dropdown select your favorite header.


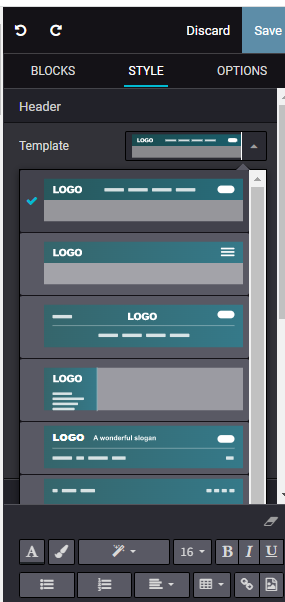
6) Next, a pop-up will be opened which will ask your confirmation for changes. Click on " OK " .

7) Click on " Save " button on the top-right corner.

To get more details on how to use the Website Builder, please do  contact us at  support@metrogroup.solutions

 1) Go to the top left and click on the menu option. 


2) Select the website module

3) Click on " Go to Website " button

4) Click on " Edit " on the top-right corner and start editing your website

5) Click on any place of footer and in the right side, from " Style " section, you will see template option. From the dropdown select your favorite footer style

6) Next, a pop-up will be opened which will ask your confirmation for changes. Click on " OK " 

7) Click on " Save " button on the top-right corner

To get more details on how to use the Website Builder, please do  contact us at  support@metrogroup.solutions


 View more FAQ's - Click Here

To get more details on how to use the Website Builder, please do  contact us at  support@metrogroup.solutions

Metro Booking System

Login to your Metro Booking System. If you do not have your URL, please contact us at support@metrogroup.solutions for details of your account. 

To begin using the Booking Management feature in Metro Booking, follow these simple steps:

1)  Sign up for Metro Booking: Visit our website and create an account to get started with Metro Booking.  

2) Access the Booking Management module: Once you have successfully logged in to your Metro account, navigate to the dashboard and locate the Booking Management module. It is conveniently located in the main menu for easy access.

3) Set up your booking parameters: Configure the necessary settings to align the Booking Management module with your business requirements. Customize options such as booking time slots, and availability to ensure the system caters to your specific needs.

4) Add bookings: Add bookings easily with the user-friendly interface. Simply select the desired date and time, specify the resource or service, and provide any additional details required.

5) Manage and track bookings: Manage and track bookings efficiently.  

To get more details on how to use the Booking System, please do  contact us at  support@metrogroup.solutions

Visit our Booking Management Website.  

1)  
Navigate to the " Booking ".  

2) Select the " Location " and " Date "  Fill in any necessary details or requirements for the slot booking.

3) Now, Clicks on " Search Icon ".

4) Available Schedules slots displayed on the screen. 

5) Choose the fix time then click on the " Book Now " button. 

6) View the " Booking Details " page and Clicks on the " Pay Now " button.

By following these steps, you can easily book your slots in the Booking Management.


To get more details on how to use the Booking System, please do contact us at  support@metrogroup.solutions

In Metro Booking, time slots can be added based on availability, allowing customers to conveniently book their desired slots. Furthermore, the software provides the flexibility to set a maximum limit for the number of bookings from a single account through the backend.  

To get more details on how to use the Booking System, please do  contact us at  support@metrogroup.solutions

Yes, Metro Booking offers a convenient feature to handle peak hour booking efficiently. Our software is designed to optimize resource allocation, streamline operations, and ensure smooth workflow management during busy periods.


To get more details on how to use the Booking System, please do  contact us at  support@metrogroup.solutions

 W ith Metro ERP, you have full control over the availability of days for bookings. Our software solution allows you to easily customize the availability of specific days according to your business requirements.

To get more details on how to use the Booking System, please do  contact us at  support@metrogroup.solutions

 View more FAQ's - Click Here

To get more details on how to use the Booking System, please do  contact us at  support@metrogroup.solutions

Accounting Management

  1) To create a purchase order, go to the top left and click on the menu option. 


2) Select the Purchase module.

3) Create a RFQ and confirm it.

4) Click on "   Receive Products  .


5) Click on " Validate " to validate the receipt


6) Go to purchase order page.

7)  Click on " Create Bill "  & click on "Confirm" button.


To get more details on configuration of charts of accounts, please do contact us at  support@metrogroup.solutions

  1) Go to the top left and click on the menu option. 


2) Select the Accounting module.

3) Click on " Vendor Bill ".

4) In the vendor bill list view page click on " Create " button.

5) Select vendor, enter product details, bill reference etc. Once you have done filling the details, click on " Save " button.

6) Next, click on " Confirm " button.

To get more details on configuration of charts of accounts, please do contact us at  support@metrogroup.solutions


  1) Go to the top left and click on the menu option. 


2) Select the Accounting module.

3) Create a draft vendor bill and confirm it.

4) Click on " Register Payment " button.


5) Enter payment method, amount etc. in pop-up window.

6) Click on " Create Payment ".

To get more details on configuration of charts of accounts, please do contact us at  support@metrogroup.solutions

  1) Go to the top left and click on the menu option. 


2) Select the Accounting module.

3) From the header click on " Customers --> Credit notes ". 


4) Click on the " Create " button on the credit notes list view page.

5) Fill the required details like customer name, product details etc..


6) Click on " Save " and then click on " Confirm ".

To get more details on configuration of charts of accounts, please do contact us at    support@metrogroup.solutions

  1) Go to the top left and click on the menu option. 


2) Select the Accounting module.

3) From the header click on " Vendors--> Refunds.


4) Click on the " Create " button on refunds list view page.

5) Now fill in the details starting by selecting vendor name and then product details and bill reference etc...


6) Once done, click on the " Save " button. Click on the " Confirm " button.

To get more details on configuration of charts of accounts, please do contact us at  support@metrogroup.solutions

  View more FAQ's -   Click Here

To get more details on configuration of charts of accounts, please do contact us at    support@metrogroup.solutions

Point of Sale (POS)


Yes definitely. Help us providing list of the payment method you are going to use. We will add it for you. In future if you want to add more you can follow these below steps:

1) Go to "Configuration --> Payment methods" from the header.

2) Click on "Create" and add new payment method and save it.

3) Click on the three dots from the POS listing page.

4) Click on "settings".

5) Scroll down a bit and come to "Payment Methods" section.

6) Select the new payment method that you have added from the dropdown.

7) Save it.

To get more details on how to use the Metro POS, please do       contact us at  support@metrogroup.solutions

Yes, possible. you can add customer from sales page. Just click on "Add customer" and add customer details. Save it once done.

To get more details on how to use the Metro POS, please do   contact us at  support@metrogroup.solutions
  

Add product/s first. Then add discount product and customise the discount percentage/fixed amount.

 
To get more details on how to use the Metro POS, please do       contact us at  support@metrogroup.solutions

You can generate duplicate receipt very easily from MetroERP POS system. Just click on "All orders" button. Select the particular order and click on "Print" button. Get the duplicate receipt.

To get more details on how to use the Metro POS, please do   contact us at  support@metrogroup.solutions

After closing the POS. Go to "Reporting --> Sales details". Select from and to date & time and click on print. Your daily sales report will be generated. 

To get more details on how to use the Metro POS, please do   contact us at  support@metrogroup.solutions
 

View more FAQ's - Click Here.

To get more details on how to use the Metro POS, please do contact us at  support@metrogroup.solutions
 

Sales Management

1) Log in to your Metro ERP Account using your credentials.

2) To create a quotation, go to the top left and click on the menu option. 


3) Navigate to the "Sales" module from the main dashboard.

3) Click on " Create ".

4) Start creating your quotation.

5) On the new quotation, you will find the following fields that need to be filled in.

6) Review the quotation to ensure accuracy and completeness.


7) Once you are satisfied with the quotation, click on the "Save" or "Submit" button and generate the final quotation.

To get more details on how to use the Sales Management, please do contact us at  support@metrogroup.solutions

1) Log in to your Metro ERP Account using your credentials.

2) To create a quotation, go to the top left and click on the menu option. 


3) Navigate to the "Sales" module from the main dashboard.

3) Click on " Create New Quotation " to start a new quotation

4) Start creating your quotation.

5) Within the quotation creation page, you will find a dedicated section to add customers.

6) Here, you can search for existing customers or add new ones by filling in their details.

7) Once you've selected or added the customer, their information will be automatically populated in the quotation.

8) You can also customize the customer details further, if needed.

To get more details on how to use the  Sales Management , please do contact us at  support@metrogroup.solutions

1) Log in to your Metro ERP Account using your credentials.

2) To create a quotation, go to the top left and click on the menu option. 


3) Navigate to the "Sales" module from the main dashboard.

3) Click and View the " Quotation " to start a new quotation.

" To confirm " an order from a quotation, you would need to create a quotation first. Please read the steps before this to help you understand how to create a quotation.

Once your quotation has been accepted by your client, you may click on the " Confirm " button in your quotation to move the quotation into the sales order stage.

Before:

After:


To get more details on how to use the  Sales Management , please do contact us at  support@metrogroup.solutions

1) To create a quotation, go to the top left and click on the menu option.


2) Select the " Sales " module.

3) Click on " Create " button and start creating quotation.

4) Select your customer. If customer doesn't exist then inside the customer field, type the new customer name and from the suggestion, click on " Create and edit ".

5) Next, a pop-up window will be opened where you will be able to add all other details of the customer and once done click on 
"
 Save " button.

To get more details on how to use the Sales Management, please do  contact us at  support@metrogroup.solutions

1) To create a quotation, go to the top left and click on the menu option.


2) Select the " Sales " module.

3) Go to your sales quotation.

4) Scroll down the page a bit and you will see " Log note " option. Click on it.

5) Type your message and mention by "@" then mention your staff name. Then click on " Log " button.


To get more details on how to use the Sales Management, please do  contact us at  support@metrogroup.solutions


 View more FAQ's - Click Here

To get more details on how to use the Sales Management, please do  contact us at  support@metrogroup.solutions
  

Purchase Management

Our solutions offer "Back order" and "No backorder" functionalities. If you don't want to deliver the remaining products then select "No backorder" instead of "Back order" .

To get more details on how to use the Purchase module, please do contact us at  support@metrogroup.solutions

There is two different ways to add vendor in your list.

You can add your vendor manually one by one.

You can import list of vendors.

To Add Manually:

Go to "Purchase" --> Click on "Vendor" --> Click on "Create" button --> Add vendor details --> Click on "Save" button

Import vendor list:

Go to "Purchase" --> Click on "Vendor" from header --> Click on "Favourites" --> Click on "Import" --> Upload the excel file (.xls) --> Click on "Import" button. Vendor details will be imported.

To get more details on how to use the Purchase module, please do contact us at  support@metrogroup.solutions

If a purchase or sales order created our system will create all corresponding documents for your company. All you need to do is just check and confirm the documents are correct and perform validations.

To get more details on how to use the Purchase module, please do contact us at  support@metrogroup.solutions

You can product very easily. you will just need to follow some steps:

Step 1: Click on "Product -->  Products", add product details like selling cost, purchase cost, taxes, Unit of measurement and also discount either in percentage or in fixed type discount. and once any quotation gets created it will automatically reflected.

To get more details on how to use the Purchase module, please do contact us at    support@metrogroup.solutions

You can set vendor/supplier pricelist very easily with MetroERP purchase management system. To set you need to do this following steps:

Go to "Configuration" from header --> Click on "Vendor pricelist" --> Set vendor name, select product, set unit price, set quantity etc...

Now at the time of creating purchase quotation, when you will select that particular vendor and product that selected price will automatically will appear in your quotation.

To get more details on how to use the Purchase module, please do contact us at  support@metrogroup.solutions

View more FAQ's -  Click Here

To get more details on how to use the Sales Management, please do  contact us at  support@metrogroup.solutions

Inventory Management

  We provide a customised approach on reporting. From reporting, you can see "Forecasted inventory" report. Here in this section, you will be able to see detailed report of product demand even filtered by monthly/weekly etc.

  We provide a customised approach on reporting. From reporting, you can see "Forecasted inventory" report. Here in this section, you will be able to see detailed report of product demand even filtered by monthly/weekly etc

To get more details on configuration inventory system, please do contact us at     support@metrogroup.solutions

You can use barcode in different operation related to inventory. You can add barcode on product level. You can add barcode with product, location, operation type etc... You can print from  configuration --> settings .

To get more details on configuration inventory system, please do contact us at   support@metrogroup.solutions

Replenish method is used to maintain stock. It ensures that there is sufficient quantity of stock is available. There is a menu in header "Replenishment" from where you can set replenishment rules.

To get more details on configuration inventory system, please do contact us at  support@metrogroup.solutions


Yes, it is possible to set product expiry date. You can set is by doing following steps:

Go to inventory dashboard --> Click on configuration --> Click on settings --> scroll down and come to inventory section --> Activate checkbox of "Expiration date". 

To get more details on configuration inventory system, please do contact us at  support@metrogroup.solutions


View more FAQ's -    Click Here

To get more details on how to use the Sales Management, please do  contact us at  support@metrogroup.solutions


CRM System


Yes, it is possible to assign same salesperson into multiple sales teams. Our solutions provides some configuration settings from where you can set-up that.

To get more details on configuration CRM system, please do contact us at support@metrogroup.solutions


Yes, our solutions provides an chat interface where you can chat with your salesperson easily. You only need to click on name of the salesperson and chat window will be opened automatically.

To get more details on configuration CRM system, please do contact us at support@metrogroup.solutions


Yes, it is possible to see the total cost. In each stage you can see the total cost. For that you just need to encode the cost of each opportunity properly. Our system will automatically calculate the total cost and will display stage wise.

To get more details on configuration CRM system, please do contact us at support@metrogroup.solutions


You can create sales team very easily with our solutions. Go to CRM Dashboard --> Click on "Configuration --> Sales Team" --> Click on "Create" button --> Add details --> Save it.

To get more details on configuration CRM system, please do contact us at support@metrogroup.solutions


Once lead is created, you can even make the lead to opportunity just by one click. Just click on the lead and you can see "Convert to opportunity" button. Click on that button and your your lead will be converted to opportunity.

To get more details on configuration CRM system, please do contact us at support@metrogroup.solutions


View more FAQ's -  Click Here

To get more details on configuration CRM system, please do contact us at support@metrogroup.solutions


Project Management

MetroERP project management system can be used in any type of industry regardless of the industry size. It will basically help to track of multiple operation dividing by different stages.

To get more details on configuration Project Management, please do contact us at support@metrogroup.solutions

You can easily calculate project profitability once you successfully created an invoice. It is important to check profitability for any project to see if the project is profitable or no longer needed. You will be just need to follow these below steps:

Create invoice --> Register payment --> Go to project dashboard (Kanban view) -->  Click on vertical three dots on particular project section --> Click on "Project updates" --> Click on kanban view (Top-right corner). Now you will get profitability details along with total sold.

To get more details on configuration Project Management, please do contact us at
 support@metrogroup.solutions


Once you successfully assigned a person to any project, you just need to hover over that person's name and you can see there is a link. Click on the link it will open a chat window where you can text / chat with that particular person.

Also, there is second way if you want to send any message to all of your followers then just click on "Send message" section and tag to whom you want to send the message.

To get more details on configuration Project Management, please do contact us at
 support@metrogroup.solutions


We will set-up SMTP for it. When any task will be changed to one state to another, you will get notified.

To get more details on configuration Project Management, please do contact us at support@metrogroup.solutions


Yes you can restrict project visibility. There is a field "Allowed internal user". You can add those persons here to whom you want to give visibility.

To get more details on configuration Project Management, please do contact us at support@metrogroup.solutions


View more FAQ's -   Click Here

To get more details on configuration CRM system, please do contact us at support@metrogroup.solutions

ERP FAQs

ERP software focuses on integrating business processes into a single, streamlined database and user interface by providing modules for each core business area, including human resources, financials, inventory management, sales, customer relationship management, and other business-critical functionalities.

The systematic and consistent flow of business data and information across all departments in a company is one of the direct effects of installing an ERP solution. Having access to this real-time data helps you to make better business decisions and guarantees that all information and data is accurate and up to date.

 Planning an ERP implementation begins with a precise formulation of the business objectives, working with the company's subject matter experts to map out the many specific qualities the organisation needs to achieve. Following identifying business objectives, we will critically link the business processes that fulfils these goals to the technology solutions.

Moving IT infrastructure and applications to the cloud minimises the need for in-house support and lowers the cost of server hardware for many businesses. Cloud-based ERP makes it simple to scale up or down functionality and users as needed. Users may join from any internet-connected web browser or device, and the solution is always up to date with the newest version of the software thus making it easier to share information across regions or locations. And because all server maintenance is done remotely by the Metro Group staff, the SaaS option frees up your IT staff for other projects.

Metro provides a SaaS (Software as a Service) cloud hosting solution, which allows clients to access their server in various ways and at different times. However, some businesses may not be ready to hand over security to a third party and instead want an on-premise solution, which is OK with us. We're one of the few software companies that can provide our clients freedom while still providing on-premise ERP solutions. We can assist you in making a decision based on your specific organisational needs.

Yes, you may. This is done by first selecting all items you wish to export, then clicking on Action and finally clicking  on Export to select what data you wish to export of the items you have selected. 

Grants FAQs

For companies looking for more support, they undertake deeper transformation in business upgrading, innovation, and internationalisation.

Companies keen to apply for the Enterprise Development Grant (EDG) should meet these criteria:

  • Be registered and operating in Singapore

  • Have a minimum of 30% local shareholding

  • Be in a financially viable position to start and complete the project

The Enterprise Development Grant (EDG) funds up to 70% of qualifying costs for SMEs and up to 50% of qualifying costs for non-SMEs. Grant applications will be assessed on Group Revenue and Group Employment Size. Refer to the specific project categories for any other eligibility conditions.

The Enterprise Development Grant (EDG) supports projects under three pillars:

Core Capabilities

Projects under this pillar help businesses prepare for growth and transformation by strengthening their business foundations. Five areas supported include business strategy development, financial management, human capital development, service excellence, and strategic brand and marketing development.

Innovation and Productivity

Projects under this pillar support companies that explore new areas of growth or look for ways to enhance efficiency. Three areas supported include automation, process redesign, and product development.

Market Access

Projects under this pillar support Singapore companies willing and ready to venture overseas. Three areas supported include Mergers and Acquisitions (M&A), pilot project and test-bedding, and standards adoption.

This is for companies looking to kick-start their adoption of technology with pre-qualified IT solutions and equipment that enhances productivity

To support firms looking to achieve productivity gains through a wide range of pre-scoped solutions, including IT solutions, equipment, and consultancy services (e.g. job redesign)

Enhanced PSG support level of up to 80% to be extended from 30 September 2021 to 31 March 2022

SMEs can apply for PSG if they meet the following criteria:

Registered and operating in Singapore

Purchase/lease/subscription of the IT solutions or equipment must be used in Singapore

Have a minimum of 30% local shareholding; with Company's Group annual sales turnover less than S$100 million, OR less than 200 employees (for selected solutions only)

  For companies looking to take their business overseas, the MRA includes:

  • Support for overseas market set-up.

  • Identification of overseas business partners.

  • Overseas market promotion.

  • Companies should meet the following criteria:

  • Business entity is registered/incorporated in Singapore

New market entry criteria, i.e. target overseas country whereby the applicant has not exceeded S$100,000 in overseas sales in each of the last three preceding years

At least 30% local shareholding

Group Annual Sales Turnover of not more than S$100 million; OR Company's Group Employment Size of not more than 200 employees

Eligible SMEs will receive the following support:

Up to 70% of eligible costs, capped at S$100,000 per company per new market* from 1 April 2020 to 31 March 2023 that covers:

  • Overseas market promotion (capped at S$20,000)

  • Overseas business development (capped at S$50,000)

  • Overseas market set-up (capped at S$30,000)

Each application is limited to one activity in a single overseas market (e.g. market entry, or participation in a trade fair)

F or companies looking to embark on enterprise transformation and develop capabilities of employees.

In each of the qualifying periods, eligible employers who meet the following conditions will be notified in writing:

Have contributed at least S$750 Skills Development Levy over the period.

Have employed at least three Singapore Citizens (SCs) or Permanent Residents (PRs) every month over the same period

Have not been qualified at any of the earlier periods.

Eligible employers will receive a one-off S$10,000 credit to cover up to 90% of out-of-pocket expenses on qualifying costs for supportable initiatives, over and above the support levels of existing schemes.